
By Matt Taylor, Red Seal Journeyman Carpenter
If you’ve set more than a couple of kitchen islands, you know the dirty secret of factory-supplied back panels: screws are usually a total disaster waiting to happen.
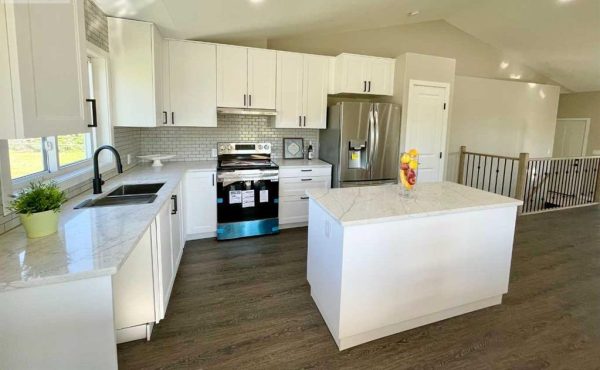
Whether you’re working with a high-end custom build or an off-the-shelf cabinet system (IKEA, Cabinet Giant, or local supply houses), finish back panels often arrive thin—sometimes just 1/8″ hardboard or delicate veneered plywood. Try driving a screw into an 1/8″ skin, and you’ll instantly get an ugly surface bubble. Drive a countersink screw half a millimeter too deep, and the head pops right through the face. Even on 1/4″ or 3/8″ panels where a screw can bite, relying strictly on mechanical fasteners creates tension points that warp and pucker under natural room lighting.
I’ve fixed nightmarish, $30,000 kitchen installs where a carpenter put screws all over a dark island under halogen work lights, only for the homeowner to look at it in morning sunlight and see dozens of glaring “bubble pops.”
After hanging back panels for over 15 years—across custom homes, rentals, and commercial remodels—I can tell you with absolute certainty: you don’t need face screws.
Using modern adhesive chemistry, smart grain orientation, old-school hot glue tricks or modern CA instant bonds, and hidden pin-nailing techniques, you can set an island back panel dead-flat, tight, and seamless. It will easily handle decades of kids, barstools, and vacuum cleaners slamming into it without a single callback.
The Snippet Killer: How Do You Attach an Island Back Panel Without Screws?
To attach a kitchen island back panel without screws, combine a primary flexible structural adhesive (100% high-grade silicone or PL) with a fast-acting 2-part CA (cyanoacrylate) instant bond adhesive and activator spray (or high-temp hot glue). Apply the primary adhesive to the cabinet carcass in a continuous serpentine wave pattern—never closed circles, which trap air and prevent curing. Apply CA glue dabs with activator spray to the corners to provide an immediate 5-to-10-second “liquid clamp.” For thin 1/8″ panels or unlevel floors, cover perimeter seams using pre-finished scribe molding or L-trim, secured with 23-gauge micro-pins set directly into hidden trim shoulders.
The “Sunlight Failure”: Why Screws Fail on Thin Backers
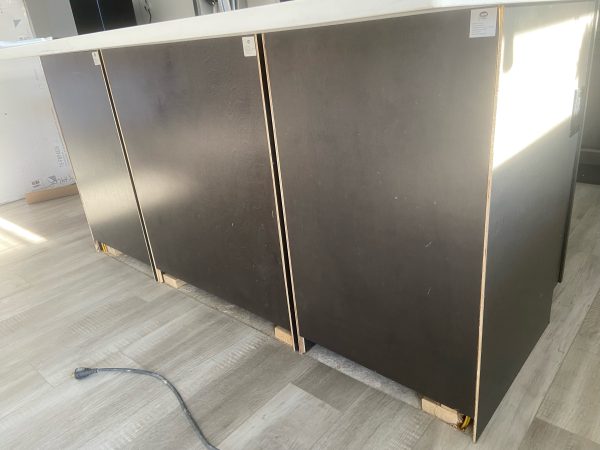
The worst job site repair I ever took over was on a massive, gorgeous dark-stained kitchen island. The installer was a capable carpenter, but he made a classic mistake: he installed the island back panel late at night under temporary job-site lighting.
To hold the thin panel flat against the cabinet carcasses, he drove screws all over the face. Under low evening light, it looked acceptable. But the next morning, when natural sunlight poured through the kitchen’s floor-to-ceiling windows, the raking light hit those subtle dimples. The panel looked like it had chickenpox. The homeowners were crushed—they thought they had to tear out the entire island and wait months for a new cabinet order.
Because he had used screws, the fix was straightforward: I unscrewed his ruined panel, ordered matching factory replacement skins, and mounted the new ones using my screwless dual-adhesive method.
When raking sunlight hit the new panel the next morning, it was dead-flat. Not a single shadow, dimple, or pucker.
The Journeyman’s Kit: Tools & Materials for a Screwless Finish
When you’re setting a panel without screws, your adhesives are your fasteners. Don’t cheap out on structural glues or buy bargain-bin caulks.
| Item | Recommended Hardware / Specs |
| Instant Clamping | FastCap 2P-10 (CA Glue + Activator) OR Hot Glue Gun |
| Primary Adhesive | 100% High-Grade Construction Silicone (Neutral) |
| Cutting Guides | Track Saw or 6′ Aluminum Level + Heavy-Duty Clamps |
| Blade Choice | 60T+ Fine Finish Circular Blade & Blue Painter’s Tape |
| Pin Nailer | 23-Gauge Micro-Pin Nailer (for trim edges only) |
| Touch-Up Kit | Wax Cabinet Filler Sticks & Color-Match Markers |
1. The Instant Tack: 2-Part CA Glue vs. The Old-School Hot Glue Trick
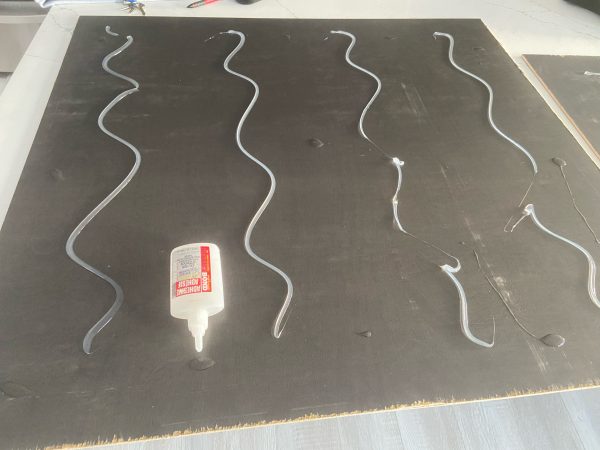
- The Modern Way (2-Part CA Glue + Activator): Products like FastCap 2P-10 or Instant Bond are game-changers. One bottle is a thick cyanoacrylate glue; the other is an aerosol activator spray. When they touch, the glue cures in 3 to 5 seconds flat. It acts as an instant “liquid clamp” so you don’t have to hold a panel by hand for 20 minutes while your main adhesive sets.
- The Old-School Way (High-Temp Hot Glue): Back when I was an apprentice—long before 2-part instant adhesives hit the trade counter—we used heavy-duty hot glue guns. You dab high-temp hot glue near the corners and press the panel into place. Hot glue cools and locks in about 15 seconds. It still works great today if you run out of CA activator!
2. The Long-Term Bed: Why 100% Silicone Beats PVA Wood Glue & Rigid Polyurethanes
- Why 100% Silicone is King: High-grade 100% silicone is my absolute go-to for island back panels. Rigid construction adhesives (like PL 200 or PL 400) cure rock-hard. When kids slam their heels or barstools crash into the island, a rigid glue line doesn’t absorb the impact—it transfers stress directly into the thin veneer, which can snap the bond or crack the panel. Silicone retains a microscopic amount of elastic “bounce.” It absorbs impact and vibration for decades without letting go.
- Why You Should Avoid PVA Wood Glue: Standard PVA wood glues (like Titebond) need porous, raw wood surfaces on both sides to form a strong bond. Island cabinet carcasses and back panels are almost always factory-painted, lacquered, or sealed. Unless you spend an hour aggressively scuffing and sanding off every drop of finish down to bare wood, standard wood glue will eventually fail under heavy foot impact.
Step 1: Pre-Cut Strategy & Controlling Blade Tear-Out
Before touching glue, your panel cuts must be dead-accurate. Cutting thin 1/8″ or 1/4″ veneered plywood requires specific blade setups depending on what saw you’re running.
Table Saw vs. Circular Saw (Mind the Blade Direction)
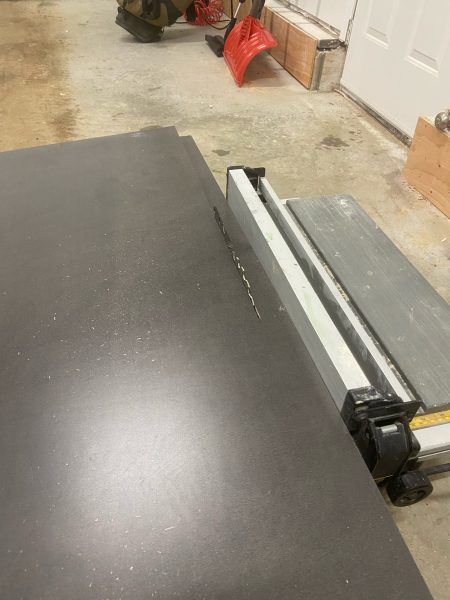
- On a Table Saw: The teeth rotate downward into the material. The good finished face goes UP. Tear-out will occur on the bottom face.
- On a Circular Saw / Track Saw: The blade teeth pull upward through the wood. The good finished face goes DOWN. Tear-out occurs on the top face.
The Painter’s Tape Trick
If you don’t own a track saw, clamp a long 6-foot aluminum level across your panel as a straightedge guide. Wrap blue painter’s tape directly over your cut line on both sides of the sheet before making the pass. The tape holds the delicate wood fibers flat against the veneer core, preventing ragged splintering.
                  CIRCULAR SAW PASS (Blade Pulls Upward)

                     ▲
                     │
    ─────────────────┴─────────────────  ◄ Painter's Tape Layer
    ===================================  ◄ Finished Veneer Face (Face DOWN)
    -----------------------------------  ◄ Core / Backing
Grain Orientation: “Fire Points Up”
If your back panel features a natural wood grain, pay attention to the grain direction before making your cuts. Always orient vertical cathedral grain patterns so the cathedral “arches” point upward toward the ceiling—think of it as making sure the “fire points up.” It’s a subtle visual rule that separates veteran carpenters from amateur installers.
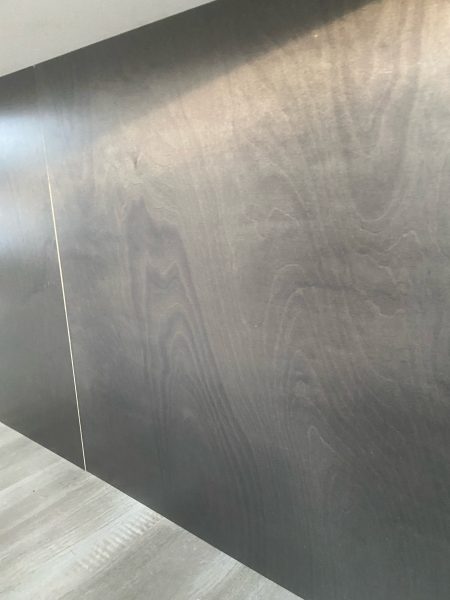
Grain up, Like Flames
Step 2: Dry Fitting, Scribing & Handling Unlevel Realities
Never apply glue until you’ve held the panel against the cabinet carcass without glue, dry fit it first. Check your floor clearances, countertop overhangs, and vertical plumb lines.
1. Handling Out-of-Square Floors (Cardboard Scribe Trick)
In the real world, kitchen floors are rarely level. If you have a noticeable dip or curve across the floor line, try this field trick:
- Before Countertops Are On: Slide a strip of clean cardboard underneath the cabinet overhang against the floor. Use a pencil and compass to scribe the floor’s exact contour onto the cardboard, cut the line with scissors, and transfer that exact profile onto the bottom of your back panel.
- After Countertops Are On: If the countertop is already installed, scribing the panel directly is tough. Instead, leave a clean $1/8”$ gap along the floor line and cover the floor transition using pre-finished scribe molding. Scribe molding is thin and flexible enough to bend naturally along floor dips without snapping.
2. The “Two-Split” Pivot (What to Do If You Over-Cut a Panel)
We’ve all made mistakes—you make a bad cut on a custom-ordered, long-lead panel, leaving you with a gap in the center. If you try to center a single butt-joint seam over a botched cut, you won’t have enough material on the ends.
Instead of waiting weeks for a replacement factory panel, use the Two-Split Method:
STANDARD SINGLE-SEAM (Risky if over-cut):
┌─────────────────────────┬─────────────────────────┐
│        Panel A          │        Panel B          │
└─────────────────────────┴─────────────────────────┘
                          ▲ Center Seam

TWO-SPLIT RECOVERY (Professional & Symmetrical):
┌──────────────┬───────────────────────────┬──────────────┐
│ Left Accent  │       Center Panel        │ Right Accent │
└──────────────┴───────────────────────────┴──────────────┘
               ▲ Trim Strip                ▲ Trim Strip
Divide the island back into three symmetrical sections using two vertical batten trim strips instead of one center joint. Breaking a long back into three balanced panels turns a field mistake into a clean, custom architectural feature. I was forced to do this with an oops cut, now its my prefered look.
Step 3: Adhesive Execution—The “Wave Pattern” Rule
This is where most non-pros mess up. How you physically lay your adhesive bead determines whether your panel stays flat or buckles next summer.
The Wave Pattern (Continuous Serpentine)
Lay your primary adhesive (100% Silicone or PL) across the cabinet box back in a wide, continuous wave pattern.
⛔ CRITICAL WARNING: Never apply adhesive in closed circles or closed squares. Closed rings of glue trap air pockets behind the panel. Trapped air prevents silicone and polyurethane adhesives from curing properly, leaving soft, uncured pockets behind the finish skin.
  CORRECT: Serpentine Wave                 INCORRECT: Trapped Air Circles
  ┌─────────────────────────────┐         ┌─────────────────────────────┐
  │  ──┐   ┌──┐   ┌──┐   ┌──    │         │   ╭──╮       ╭──╮       │
  │    └───┘  └───┘  └───┘      │         │   ╰──╯       ╰──╯       │
  │  ──┐   ┌──┐   ┌──┐   ┌──    │         │       ╭──╮       ╭──╮   │
  │    └───┘  └───┘  └───┘      │         │       ╰──╯       ╰──╯   │
  └─────────────────────────────┘         └─────────────────────────────┘
  (Air escapes; full cure)                (Traps moisture & air pockets)
Applying the Dual-Adhesive Bond
- Apply your primary silicone in wide wave lines across the center framing of the cabinet back.
- Near the four outer corners and along center stiles, apply 3 to 4 small dabs of the 2-Part CA Glue (or hot glue).
- Spray the corresponding contact spots on the back of the panel with the Activator Spray.
- Press the panel firmly into position.
The moment the CA glue touches the activator, it cures in 3 to 10 seconds. It holds the panel dead-flat against the carcass while the flexible silicone behind it cures over the next 24 hours.
Step 4: Perimeter Trim & The “Micro-Pin” Stealth Technique
Once the main back panel is locked in place, complete the installation with perimeter corner trims (L-molding, scribe molding, or vertical batten strips).
While the primary bond comes from glue, trim pieces subjected to lateral kicks need mechanical backup:
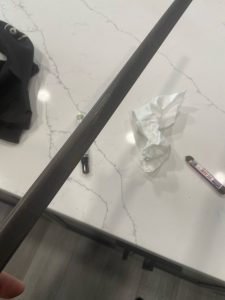
- Apply a thin bead of silicone and a drop of CA instant bond to the back of the trim piece.
- Position the trim snugly against the floor and side panels.
- Fire 23-gauge micro-pins (maximum 3 per side) directly through the thickest part of the trim profile.
Keep pin counts low (no more than 3 to 6 total per trim run). 23-gauge pins leave a microscopic hole that disappears completely under a touch-up stick.
Step 5: Custom Stain Chemistry & Touch-Up Mastery
Even clean cuts leave tiny white lines on pre-finished wood or dark-painted cabinets. Never walk away from a job without performing a final touch-up pass.
Custom Mixing Wax Filler Sticks
When working with pre-finished wood cabinets, off-the-shelf filler sticks rarely match the factory stain 100%.
The Journeyman Trick: Buy a multi-color pack of wax filler sticks. Scrape small shavings from two or three different shades (e.g., a bit of dark walnut, warm oak, and cherry) and knead them together between your fingers to create a custom blend that matches the wood’s natural tone shifts. Rub the wax back and forth across micro-pin holes or seams until filled flat, then buff the excess clean using a plastic putty knife or shop rag.
┌────────────────────────────────────────────────────────────────────────┐
│                        Touch-Up Tool Comparison                        │
├───────────────────┬──────────────────────────┬─────────────────────────┤
│ Tool              │ Best Used For            │ Application Method      │
├───────────────────┼──────────────────────────┼─────────────────────────┤
│ Wax Filler Sticks │ Pin-nail holes, gaps,    │ Rub across hole until   │
│ (Custom Blends)   │ and surface gouges       │ flush; buff with rag.   │
├───────────────────┼──────────────────────────┼─────────────────────────┤
│ Color-Match       │ Cut edges, veneer chips, │ Dab lightly; immediately│
│ Stain Markers     │ and inner corners        │ wipe to blend.          │
└───────────────────┴──────────────────────────┴─────────────────────────┘
Summary Checklist: The Screwless Island Back System
- Dry-Fit First: Verify floor-to-counter clearance and seam locations before opening glue tubes.
- Prevent Tear-Out: Cut with fine-finish blades (60T+) and tape your cut lines with blue painter’s tape. Remember: good side UP on table saws, good side DOWN on circular saws.
- Orient the Grain: Make sure vertical cathedral wood grain points UP (“fire points up”).
- Wave Pattern Adhesive: Run 100% silicone in continuous serpentine waves—never closed rings.
- Instant CA Clamp: Use 2-part CA glue + activator spray (or hot glue) on corners for a 5-second hand-held bond.
- Micro-Pin the Trim: Secure perimeter scribe molding or L-trim with a couple of 23-gauge micro-pins set into hidden shoulders.
- Fill & Blend: Custom-blend wax filler sticks to conceal pin holes and seam transitions for a completely seamless finish.